

The Last Stand of the Magisters is a Quest in Divinity: Original Sin II. The Magister Barracks has a hatch that could potentially be harboring some dark secrets. Would you be able to unlock them?
Important NPCs
The Last Stand of the Magisters Objectives
- Talk to Kemm about the magisters and learn about their fate in the barracks.
- Interact with the hatch in the Magister's barracks.
- Get past the encrypted hatch.
- Enter the large chamber deep in the vaults.
The Last Stand of the Magisters Walkthrough
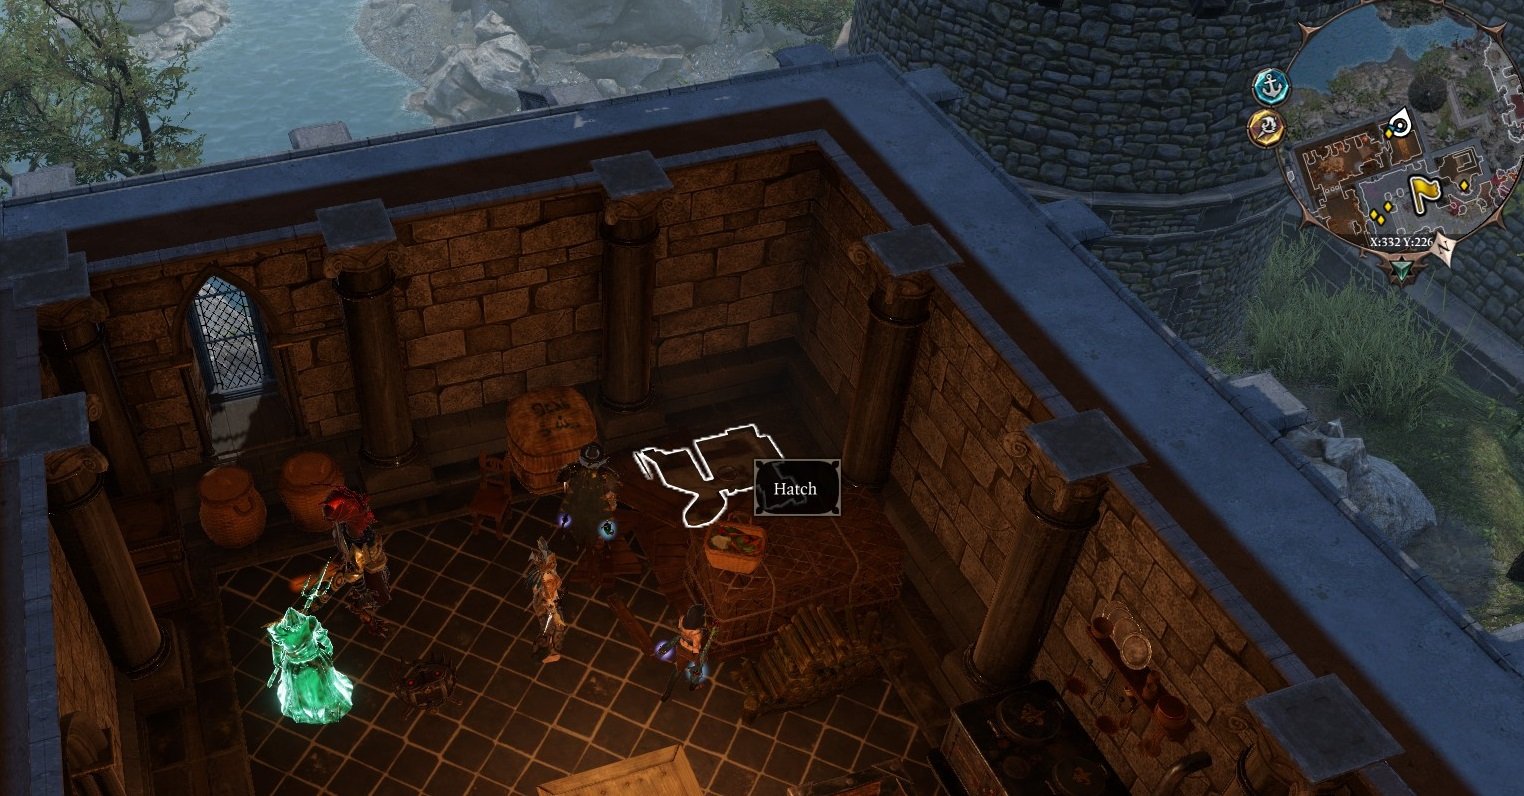
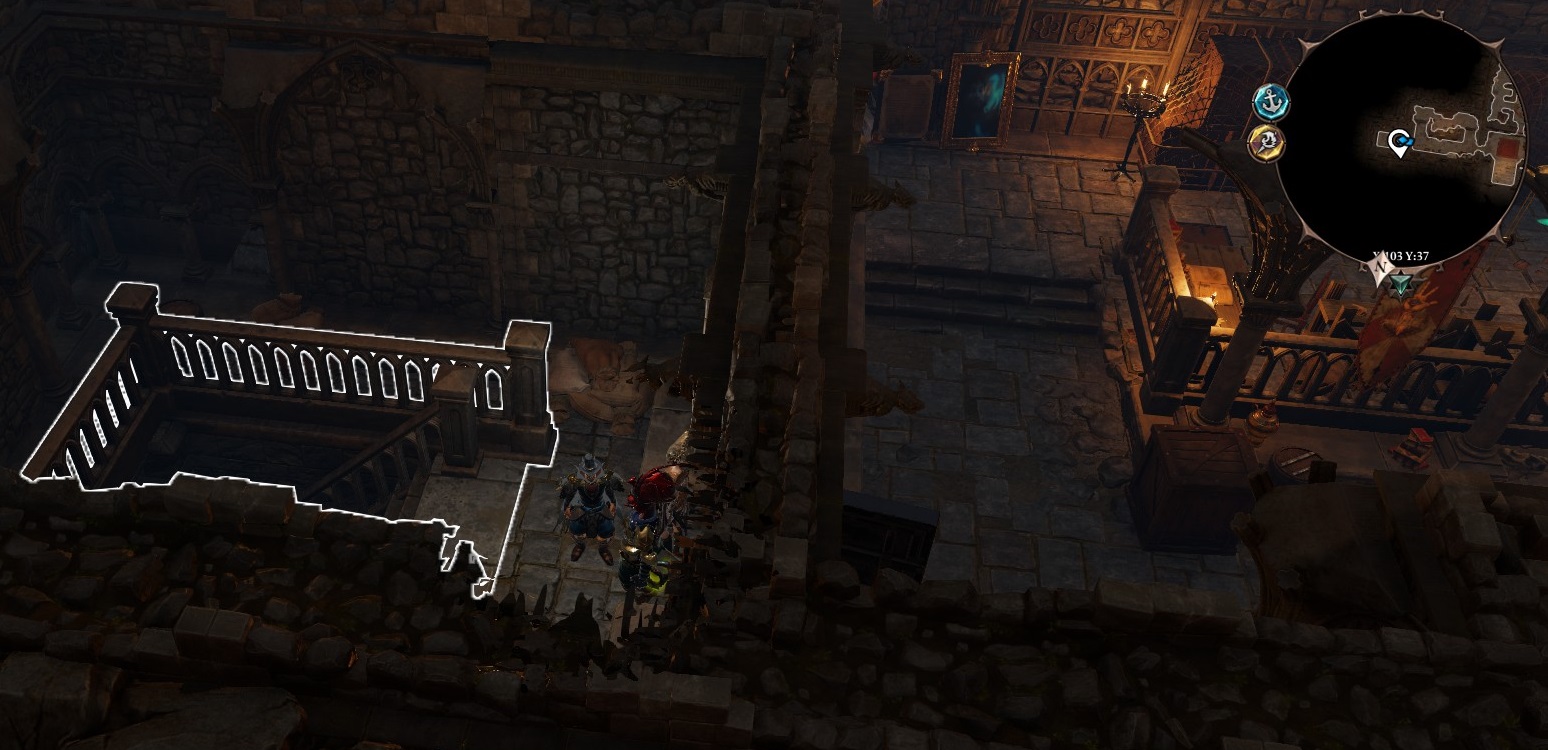
Upon entering the Magister's barracks, you will find the paladins busy finding the secrets of the magisters. Upon entering the room as shown in the picture below, you will find some traps here, as noted by your character, which potentially means that the magisters are hiding something. If you look closely, you will find a hatch hidden nicely beneath some crates in the room, as shown below. Interacting with the hatch will reveal that it is locked by some combination code, however.
Casting Spirit Vision at this point will reveal the spirit of High Cryptographer Marwell, the magister who devised the encrypted hatch. You will need to interact with the hatch first before you can speak to him about the encrypted combination, though. Anyway, speaking to him about the combination will require you to pass a speech check before he will reveal that the combination is related to the plaques in the previous room.
The correct combination to open the hatch is related to magister's motto:
- Mind
- Body
- Society
- Divine
Upon correctly putting in the combination and unlocking the hatch, you will gain 58,175 XP for solving the puzzle. You can also simply lockpick the hatch with high enough thievery (DE Edition)
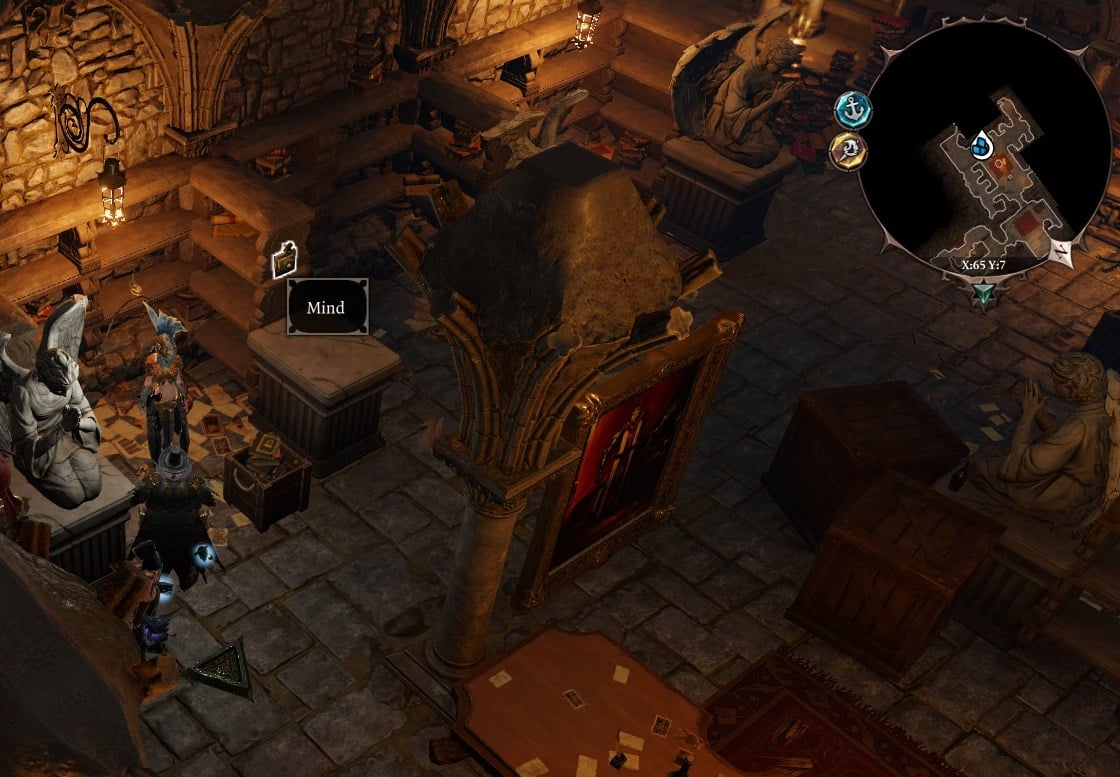
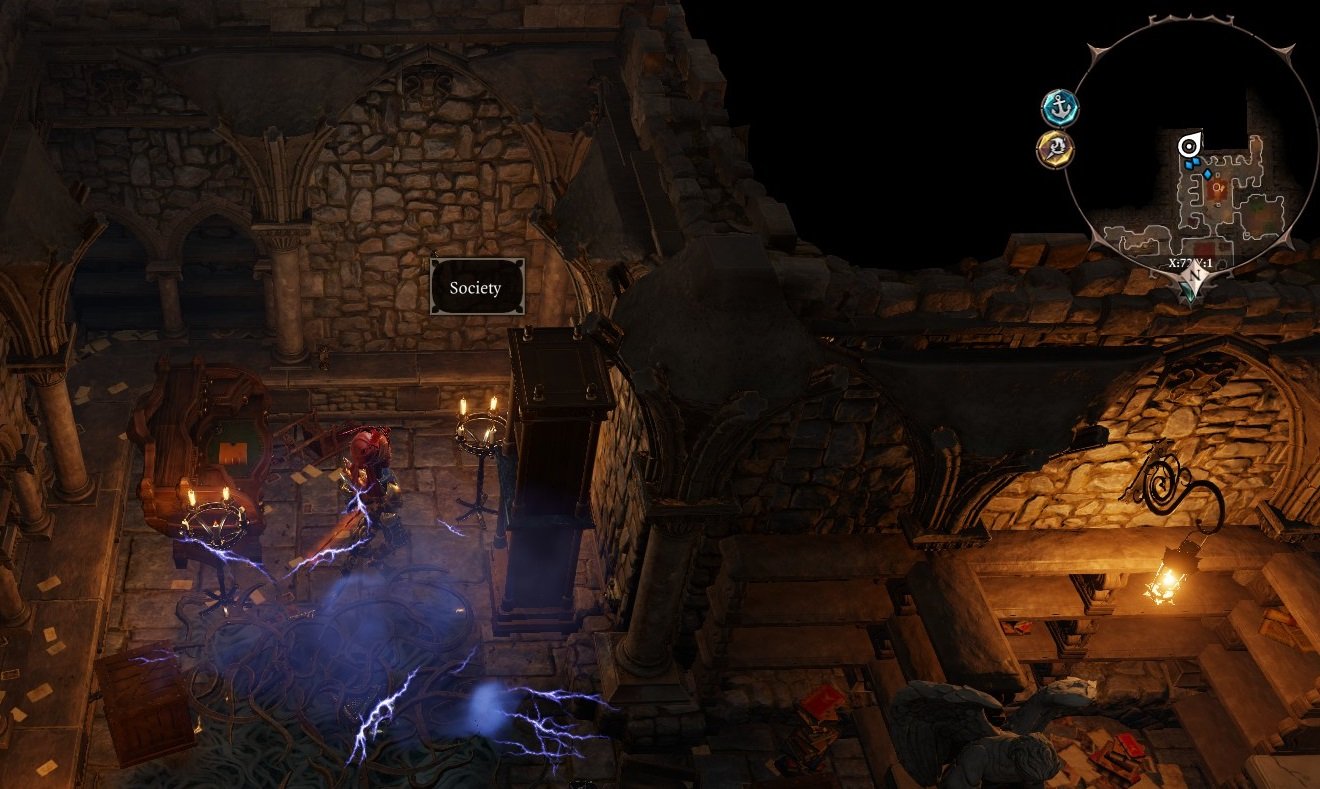
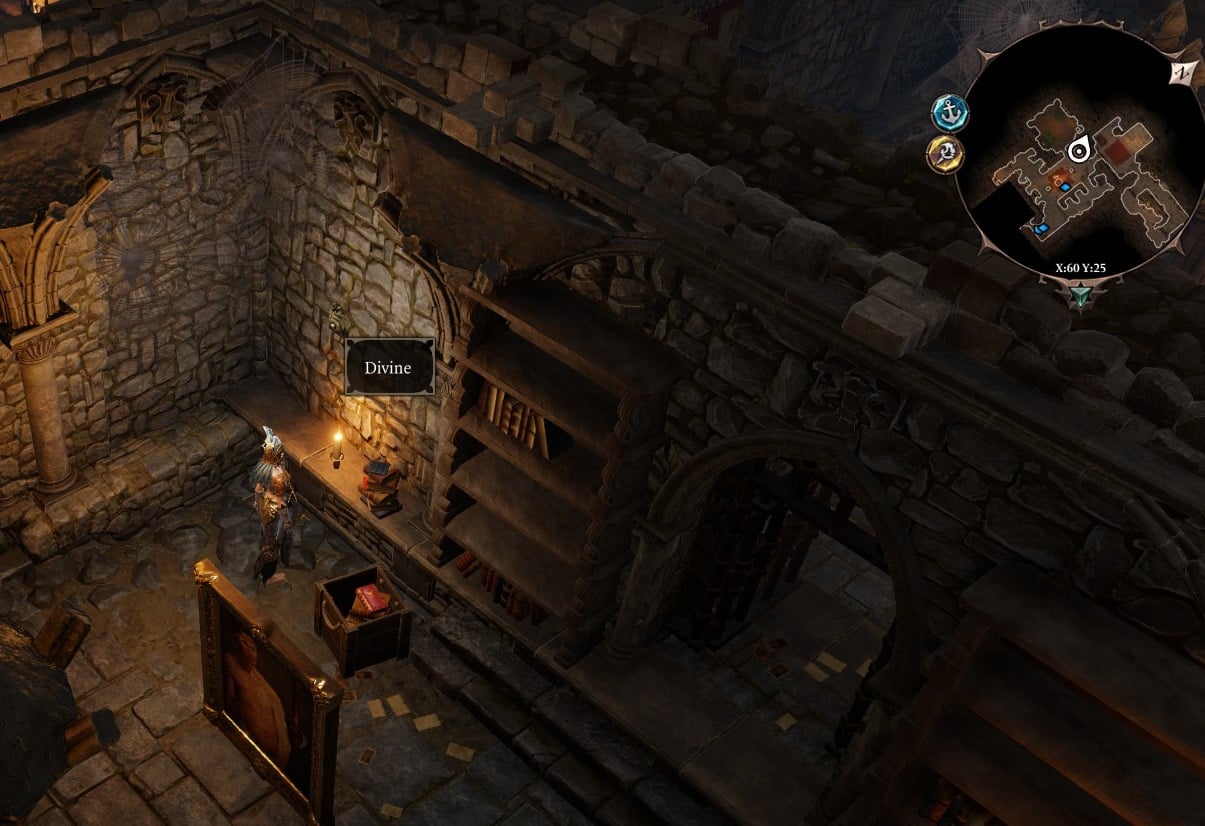
Enter the hatch and you will be inside the magisters vault. There are 4 switches here, cleverly hidden behind the paintings. Remove the painting to see them better (optional), and activate them in the correct order to open a secret chamber. The correct order is the same as the hatch: Mind - Body - Society - Divine. The pictures below detail the location of each switch.

Activating the final switch will reveal a secret chamber. Inside this secret chamber, read the open report near the table, gaining 38,800XP (No XP in DE Edition). Cast Spirit Vision here and you can also learn some information.
On this level, you can also find a book named "Report on the Toyseller", which gives you the quest "A Craftsman of Dreams and Nightmares". It is on a desk to the left immediately as you enter the room with concealed switches (NOTE : If interacted with the spirit of magister Wainslow to find Brannt earlier in the Barracks, then, the book will be found on Brannt's body instead).
In the picture below, you can head down the stairs to the lower level, or you can go near where the "Society" switch is located, and press the hidden switch next to the bookcase to reveal a nice treasure vault with loads of nice treasure. There is a unique staff here, and various other trinkets, but note that if you choose to enter the locked hatch in this vault, you will potentially come face to face with the gheists in the lower level and initiate combat immediately. It might be better to head down to the lower levels using the stairs as shown in the picture below in order to give yourself some preparation time.
Regardless, head down to the lower levels. You will encounter 3 gheists, as well as Magister Reimond, if you have not already killed him back in Act II. Each Gheist will grant 96,950XP when killed (38,800 XP each in DE Edition including Reimond). Note that if you use fire spells here and burn the oil, the surrounding pile of books will be turned and their notes will be turned to ash, rendering them incomprehensible. If Magister Reimond is here, he may use fire spells, but if he is already dead, then there should be no worry as the gheists do not cast spells. The Gheists try to, however, destroy the nearby chandeliers, which will set the oil on fire; it is necessary to teleport the chandeliers away from the oil. After the battle, you may find a book and some notes on Reimond's body that advances the main questline. If Reimond is dead, casting spirit vision and talking to him may yield some information, but he will otherwise remain uncooperative and disappear shortly after. If the piles of books have not been burned to cinders, you will find notes here that updates your journal similarly. Reading the open journal on the table will update the quest, in case Magister Reimond is dead. Reading these books grant no XP, however.
You can also find a secret document here (platform at NW corner of the map), which when read, details the danger of a powerful sourcerer Karon. Reading it will immediately grant 38,800XP. The Ornate Chest here will contain the unique level 19 spear, Ednet Voor. On the upper platform, you can also find the spirit of Eithne the Trader, especially if you completed her quest back in Act II, where she will express dismay at dying and wish to live again, willing to even swear the "covenant" in order to be alive again.
At this point, return back to Linder Kemm, and tell him about what Dallis is plotting. Note that if you pick the dialogue options to test him, he will initiate combat. In any case, reporting to him without testing his patience will resolve this quest, rewarding you with a choice of legendary-quality loot. (In the DE Edition Lord Kemm will come to the room where you fight Reimond and the Gheists)
Rewards:
- 58,175 XP for unlocking the encrypted hatch.
- 38,800XP for reading the open report about you, Arhu, and Kemm. (No XP in DE Edition).
- 96,950XP per Gheist kill, for a total of 290,850XP for all 3 Gheists. (38,800 XP each in DE Edition including Reimond 155,200 XP total)
- 38,800XP for reading the secret document about Karon.
- A choice of Legendary-quality loot, upon completion of the quest.
 Anonymous
Idk if this happened to anyone else but I looted the Dwarven Princess letter before Kemm shows up, and they got very upset with me for stealing...?
- Anonymous
The correct method is shown in the photos not in the order described
- Anonymous
This info would be a great help if it weren't completely WRONG! The correct order on the paintings is mind...body...society...divine.
- Anonymous
1) After interaction with the spirit of Reimond (and having taken the information from his corps?) Linder Kemm came in => dialog, XP and reward.
The Party did not need to return to him.
2) There is a lever on the NW platform to lower a ladder:
It leads to a separate room right beside the place where Windego is imprisoned, a place where "research" had been made
And from which you can reach Windego (you can easily destroy the obstacles without negative reaction of the guards).
- Anonymous
- Anonymous
Maybe I come late, maybe it's definite edition I played. But my experience quite different from this guide/some comment down there
1. Doing the button puzzle, Mind - Body - Society - Divine, open the gold pile room near the Divine button, which lead to Unique Gear
2. Body and DIvine button swapped position compare with this guide.
3. The button named "Button" does not required button puzzle above to be solve, pushing it lead to hatch room.
- Anonymous
As of DE, no XP is given for reading the open report. Also, each gheist only grants 38 800 XP.
- Anonymous
if you come from the stairways down and fight the Gheists. Just use sneak if you have it high enough. My ranger was sneak 7 with gear. So he went around and stole all the explosive oil cans. JUST in case. Also he went around and stole all the paperwork and documents too. Just in case. FINALLY....step 1. Place your ranger person by either left side or right side areas that are above the gheists. If you align the ranger correctly, he could use his armor piercing arrows to go through two gheists at the same time. 2. If your melee person has a good enough sneak. mine was sneak 1. I was able to get the melee to the back side of the 3 gheists. By the golden chest. 3rd step. At this point have have the melee person initiate attack with his shield tossing skill. That should soften up the gheists for the ranger to armor pierce all 2 in a row...or...the ranger could use richochet shot and see if he can also take out all 3. Hope that proves entertaining.
- Anonymous
*Spoiler*
I opened the seceret room by inputting Mind, Body, Society, Divine.
the brazier in the gheist fight room opens a ladder to the left of the pillar west of it that has a ladder leading to the seceret room as well
- Anonymous
Found the gold pile room by accident and was like "holy mother of g!". Pile contained 512 gold.. I mean come on
- Anonymous
Mass Corpse Explosion can pretty much 1 shot the Gheists, just sneak to get close to them
- Anonymous
Sorry but this is all BS, I pressed the buttons in the correct order several times and just had Lohse saying 'that didn't sound successful' each time. Also for me the society and divine buttons had swapped places. I can't seem to be able to do this one. Tried putting the words in correct order and swapping over divine and society because of the change in button positions.
- Anonymous
you can solve the combination without figuring out the logic (which makes no sense to me)... because it says 1,2,3,4 and then the clues say the same thing, the plaques say the same thing and yet, the combination is 1,3,2,4 and i don't get it however. with the hatch, when you put each digitt in, if it is correct, it says "it clicks" , if it doesn't click, you have to start over. so you can do like ...try 4, it doesn't click, okay, start over, try 1, it clicks, then 2, doesnt click, okay start over, try 1, click, 3, click, 2 click. basically just listen for the clicks. then the second time around with the buttons behind the paintings, if you push the right button, your character remarks "i hear machinery turning" and if you do it wrong, your character remarks "i must not be doing it right"
- Anonymous
- Anonymous
The description is for the first lock is actually wrong. You have to put in the order in which the plaques hanging on the wall in the sleeping room. Which is 1 - 3 - 2 - 4 (starting from the door to the left).
- Anonymous
The first time I did this game, I had no problem getting into the sothrroom with the pile of gold. Second time through, nothing I do will reveal the switch that is supposed to be close to that door. I tried pumping a character up to 40 Wits, but it still fails to appear. (The first time I played, I didn't do any proper builds, so there's no way any of my characters had anything like 40 Wits. And yet I got into the room easily. I just don't remember how I did it.) BTW, I had no trouble getting into the room with the ghost and the Death switch. I've seen other people say they also can't get the switch to appear even with Wits in the 40s. Is there something I'm missing? Someone I need to speak to first?
- Anonymous
You don't need to go anywhere, Kemm shows up right away and tells you to bugger off, but you can switch to another character mid-dialogue and get everything or tell him you want to stay around, as his men don't find anything of course. Reimond's spirit was here, but I finally killed him in Act 2, the coward running off like that, but then the spirit took off, and I could've consumed his Source first, so I think I'll go back a game save and do that, Don't know how he got here, I'm pretty sure I consumed his Source in Act 2 after crushing him...
- Anonymous
For GERMANS. Verstand - Leiche - Gesselschaft - Göttlichkeit. Some specialist has translated Body(Körper) to Corpse(Leiche) in german.
- Anonymous
Strange, fire started during the fight but the important documents that were not on the table did not burn (I picked up immediately those on the table before anything else), also, Reimond was not there and I hadn't killed him at the blackpits, he ran away when he was low on health... His spirit was there though.
In Definitive Edition, the Gheists are only worth 38k exp or so each, which is a massive let down. They're VERY easy to take down: thunderstorm. It will automatically stun them all. I'll add the mention of another bug, Reimond, that I had already killed before, didn't have spoken dialogues as a spirit, only texts.
- Anonymous
- Anonymous
Not sure if definitive edition thing but the correct order for the buttons was the same as the hatch, Mind - Body - Society - Loyalty.
The loot is only legendary (not divine) when you report back to Linder Kemm at the end, and fixed at lvl 18...meh. I did get like 5 useless of divine gear searching through the entire vault though -_-
- Anonymous
Yo can cast Teleportation on the brazier, to remove it from the pressure plate, on the last room the one with the gheists, but i still dont know what does it do.
- Anonymous
Umm, I can't complete the quest cause I killed Kemm prior to this
- Anonymous
- Anonymous
In the room with the 3 gheists there is a pressure plate beneath the leftside brazier near them, but I cant figure out what removing the brazier unlocks though, although there is a distant rumbling.
- Anonymous
Just 1 turn kill them and chamelon cloak, rinse and repeat, Sebille solo ftw!
- Anonymous
- Anonymous
U don't haf to do the button combo there is 1: secret button close to society where the book shelf is that opens the hidden room with one click.
- Anonymous
- Anonymous
I used terrain swap with poly and then nuked 2 of the 3 gheists down in one turn with fane using time warp and fire. As long as no fire touches oil you're good.
- Anonymous
the gheists still can hit the barrels and explode into fire, those note went burnt and i cannot finish my quest for now...
- Anonymous
what about death ? what it do ? it is behind the painting in hidden room
- Anonymous
I already killed Reimond before chapter 6 how the hell do I advance the plot if he's already dead.
- Anonymous
- Anonymous
When you sneak in the room with the three gheists, you can get rid of all the oil barrels and kill them smoothly without burning the whole room down. Saves a few piles of books.
- Anonymous
Idk if only this happened to me but , i was not being able to close the mission completely after killing the gheists but after i did the *Secret of the dwarves mission* i reported to Magister Reimond that i saved the city, he thanked me and vanished afterwards.
That led me to finally report to Paladin Kenn and close the mission.
- while your character is talking to Magister Reimond you can loot the place with your other characters and get in place for battle.
- one easy way of bypassing his firebomb easily is to bless the oil, either just before initiating battle or first turn (with high enough initiative.) This will not prevent the destruction of books/vases, but it will make an already easy battle even easier.
- the papers dont seem to award EXP on DE, but tons of lore update
- while talking with Kemm you can attack and kill the Paladins for 38800 exp each, there are 6 of them. The character in dialogue with Kemm or Kemm himself can not join the battle, so its best to have it over by the stairs so they dont get caught in the crossfire.
0
+10
-1